In this article, we are going to learn how to use Nlog to log messages into SQL Server.
We are going to see how we can configure an ASP.NET Core Web API project to support NLog and how we can configure NLog using an XML configuration file.
|
CREATE TABLE Logs(
Id int NOT NULL PRIMARY KEY IDENTITY(1,1),
CreatedOn datetime NOT NULL,
Level nvarchar(10),
Message nvarchar(max),
StackTrace nvarchar(max),
Exception nvarchar(max),
Logger nvarchar(255),
Url nvarchar(255)
);
|
We created a Logs table with 8 columns. We are giving each column a name that describes the kind of log message it will store.
Project Setup
We need to create a three projects:
1. The main project that called Nlog.API
2. The project for business logic is called Nlog.APIBusinessLayer.
3. The project to create a model and DbContext where we can perform the SQL operations is called Nlog.APIDataLayer.
To start, we will create an ASP.NET Core 6.0 web Application with a project type of web API and call it Nlog.API.
Require packages in Nlog.API:

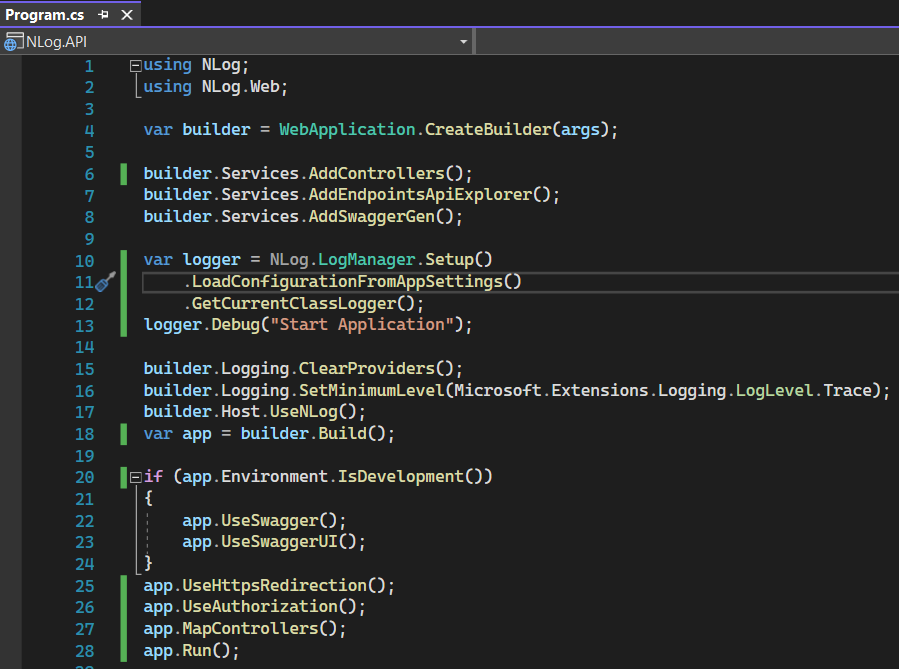
Configure NLog in the Program.cs file

1. To start logging, we need to create a Logger instance. Before creating the Logger instance, we are configuring Nlog by passing the configuration file nlog.config.
2. The GetCurrentClassLogger() method returns the Logger instance with the name of the current class (Nlog.API.Program).
3. The logging.ClearProviders() method clears the default logging providers added by builder.
4. Then we are calling UseNLog(), an extension method for builder to register NLog as a logging provider for our entire application and set it up for dependency injection.
Set up the appsettings.json file
The log level is set to Information in the appsettings.json file. This setting overrides the log level we specify in Program.cs when we call logging.SetMinimumLevel(LogLevel.Trace). Let’s update the Default key in the Logging section of our appsettings.json file.

Create NLog.config File
In the project root, create a text file and name it nlog.config:

1. Our configuration file contains a single target and a rule. We create a database target and insert the values that will be stored in our Logs table when we log a message.
2. The commandText attribute contains an SQL statement to insert the values in the Logs table.
3. We created parameters that hold the values.
4. The value associated with each parameter name is what gets returned from the layout attribute.
5. Each layout attribute returns the value of the layout renderer that we pass to it.
6. ${date} and ${logger} are examples of layout renderers that return the current date and time.
7. Note: Change the connectionString and internalLogFile path to match your system.
Setup logging in HomeController
The final step is to create a simple endpoint in HomeController.cs.

To add custom logs, I added a list of Summaries. I will use this to generate a JSON value.
Now let’s launch our application and navigate to https://localhost:7098/swagger/index.html

Data stored in SQL Logs table

The wildcard character (*) tells NLog to include all log messages including messages from Microsoft. If you want to skip all log messages from Microsoft and log only our messages, we can change the rule:.

This rule will discard log messages from Microsoft.Hosting.Lifetime.
Lastly, if any error occurs during the setup, NLog logs its errors in the path specified in internalLogFile of our config file. This file helps in debugging.

If you want to log only exceptions in SQL Database and Log internalLogFile then update the minLevel value to Error in the nlog.config file like below.

Enjoy Coding..!!